How to Recover Lost iPhone Data
This brings us to the need for a worthy data recovery tool for our iOS devices like iPhone, iPad, and iPod Touch. Primo iPhone Data Recovery software is one such tool that can be used by the iOS users to make sure that their memories are safe and nothing is omitted while performing a recovery.
Major features of Primo iPhone Data Recovery
This tool promises to recover about 25 types of iOS content from your smartphone, including data like Contacts, Call History, Notes, Reminders, Photos, Videos, Music, Voice Memo, WhatsApp data, etc. This wide range of support ensures that all kinds of lost files are restored in the process.
Primo iPhone recovery software supports the latest iPhone 7 and iPhone 7 Plus, along with iOS 10. So, you don’t have to worry about the compatibility issue. The other supported devices are iPhone SE, iPhone 6, iPhone 5, iPhone 4s, iPad Pro, iPad Mini 4, iPod Touch 6, etc.
Using this tool, you can get back your lost data by using three methods. You can get back the data from your iDevice itself or use iTunes/iCloud backup. The recovered messages, notes, contacts, and other information can also be saved to the computer in formats like HTML, CSV, TEXT, etc.
Apart from giving back your lost information, Primo’s software also fixes your device from update errors or iOS system errors. These errors could be an iPhone stuck on black screen, white screen and Apple logo, or simply a looper recovery mode.
How to use Primo iPhone Data Recovery?
If you have the basic working knowledge of any computer, things will turn out to be pretty fine for you. The creators of this software have created it with simple and clear options for the users.
To get started with Primo recovery tool, you need to first download it from their website. After this, proceed with the usual installation steps.
Now, let’s tell you how to use the software for recovering your lost data:
Once you launch the program, you’ll see a clean interface with 5 options in the left pane. By default, the first option of “Recovery from iOS Device” is selected. You’ll also see a message to connect your iOS device. Primo recommends you to go with this option if your device works properly and you’ve just experienced a data loss. You’re also recommended to use this option if you didn’t perform a sync with iTunes or iCloud.
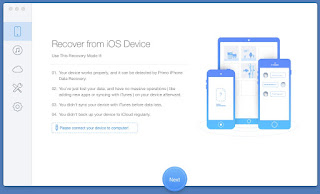
After connecting the device, you’ll see a popup telling you that your device is connected. Now, you’re good to go.
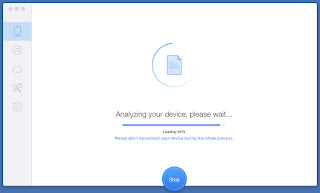
Simply click on the “Next” button located at the bottom to proceed. It’ll show that the software is analyzing your device, so don’t disconnect during this process. It might take few minutes depending upon the storage capacity and data stored on your device.
Now, you’ll see different file types and sources listed in the left pane along with the number of files. From the option given at the top, you can choose whether to show all files or just deleted files. You can also see the preview of the files that need to be recovered.

By simply choosing them and clicking on the “Recover” button at the bottom, you can get your files back. While going ahead with the recovery option, don’t forget to choose the export destination, i.e., your device or computer.

Now, the second option on the left pane deals with the iTunes backup. If you keep connecting your iPhone or iPad to your Mac regularly, iTunes keep creating the backups on a regular basis.
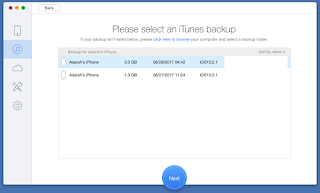
After choosing this option, you’ll get to see all the iTunes backups available. For example, in the picture shown below, there are two backups to choose from. After you’ll select “Next” option at the bottom, you’ll be asked if you wish to compare the data or simply scan the backup.

Going ahead with either of these options will show you the contents of the backup. If you choose the compare option, you’ll be able to see what’s missing from your device. The rest procedure of choosing the files and exporting to the destination remains same.
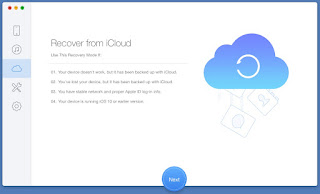
The third option for iCloud recovery turns out to be useful when your device isn’t working but it has a backup stored in the cloud. It also comes in handy when you’ve lost your iOS device, but you need to retrieve its backed up data from the cloud. You simply need to enter your iCloud credentials and scan the downloaded backup files.
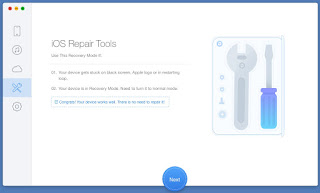
The fourth option is for iOS repair. If your device gets stuck on black or white screen, or your device is in the restart loop, this option will help you out. It can also be used to take care of device which in the recovery mode.
With the settings option, the output format of the recovered files and Export/Backup path. You can select the desired options as per your convenience and complete the recovery process. The application, after scanning, categorizes all your data in different folders, making it pretty comfortable. The file preview also makes it easier to decide which data needs to be recovered.
You can go ahead and download Primo iPhone Data Recovery for Windows and Mac. Apart from its trial version, the lifetime paid version, which costs $39.99, comes with a 60-day money back guarantee.